FactoryTalk View ME: Start-up Splash Screen With Macro
Have you ever wonder how to add a “start-up splash screen” to PanelView Plus that would display certain page or graphic (company logo) for a few seconds, before switching to the project's main menu?
Here we will use FactoryTalk View Macros without using PLC code.
Here we will use FactoryTalk View Macros without using PLC code.
Click here for FactoryTalk View ME: Start-up Splash Screen With PLC.
Steps to be taken:
The steps we need to take to complete this object are as follows:- We need to detect when the PanelView launches our project, and we can do this by setting our start-up splash screen as the default display, and giving that display a unique display number, which in our example is 99.
- After the set period of time has elapsed, we need to command the HMI to display our main screen, which in this example will have a display number of 1 (no other displays can have a display number of 1 or 99)
- Once the main screen is displayed, we need to release screen control to the operators so they navigate the HMI
Steps for Start-up Splash Screen:
- Our first step is to open the “HMI Tag Editor” and create two HMI memory tags, both of which I'll put into a new “Memory” HMI tag folder.
The first tag is named “StartUpTime” with the settings shown below:
The second tag is named “DisplayControl” with the settings shown below:
- Next, we close the “HMI Tag Editor” and open “Global Connections.” Then we set the “Remote Display Number” to our new “Display Control” tag, and click on “OK” to save our changes:

- Next, we open each of our project's Graphic Displays and insure they each have a unique “Display Number.” This setting is found in the “General” tab of “Display Settings” which is found in the “Edit” and “Right Click” menus when the “Graphic Display” is selected:

- Now that we've updated and saved all our graphic displays, we next open “Startup” and insure our start-up splash screen display is set as the initial graphic. In this example that screen is named “LOGO.” Once done we click on “OK” to save our settings:

- At this point we need to create our first new Macro:

- This macro will have a Tag of “Memory\StartupTime” and an expression of “system\DateAndTimeInteger,” as shown below:

- The we save this new Macro as “StartUpMacro::

- Now we return to “Startup” and select our new “StartUpMacro” as our “Startup Macro,” as shown below:

- From there we head over to Global Connections again, and this time we go to the “Macro” tab:
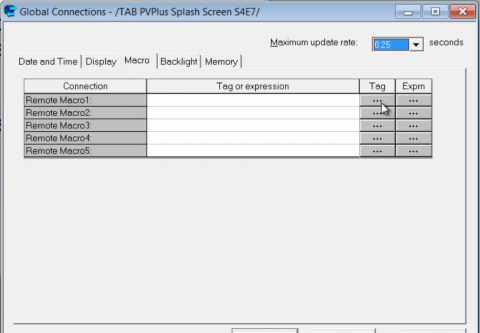
- Under “Remote Macro 1” we add the following expression as our trigger and click “OK” twice to save it:
system\DateAndTimeInteger > Memory\StartUpTime + 10
- We now need to create two more Macros. The first has a tag of “Memory\DisplayControl” and a value of 1, and must be saved with a name of “Macro1”:

- The next has a tag of “Memory\DisplayControl” and a value of 0, and is saved as “StartUpDoneMacro”

- The last step is to open our “main” screen (with a display number of 1) and set the “Display Settings – Behavior” to use a Startup Macro of our new “StartUpDoneMacro,” as shown below:

- Now when we run our project, our “LOGO” start-up splash screen will be displayed for ten seconds. After which our “main” screen will be displayed, and the “Remote Display Number” will be reset to 0 to allow operator navigation control.

Comments
Post a Comment